You can accomplish a lot simply by asking questions and getting answers from AI on the web. But to create and edit files, run programs, and fix errors, you need an environment that connects AI to your actual workspace.
This article goes beyond asking AI questions on the web to set up an environment where you can work with an AI agent. We will install VS Code (Visual Studio Code) and OpenAI Codex on 64-bit Windows, bringing file management, code creation and editing, and terminal commands into a single workspace.
A similar workflow is also possible with other AI agents, such as Claude Code, GitHub Copilot, and Antigravity.
You can check the system type by pressing Win + Pause/Break to open system information. Unless it is an older computer, most PCs use a 64-bit operating system and an x64-based processor.
Once the environment is ready, we will create a simple Snake game to experience how Codex creates files, runs programs, and makes changes. The screenshots show a web game running in a browser. We will also cover preparing a Python development environment and building a Windows executable. The focus is on learning the basic workflow of creating something through conversation with AI, rather than learning complicated programming concepts.
Here is the VS Code layout we will use:
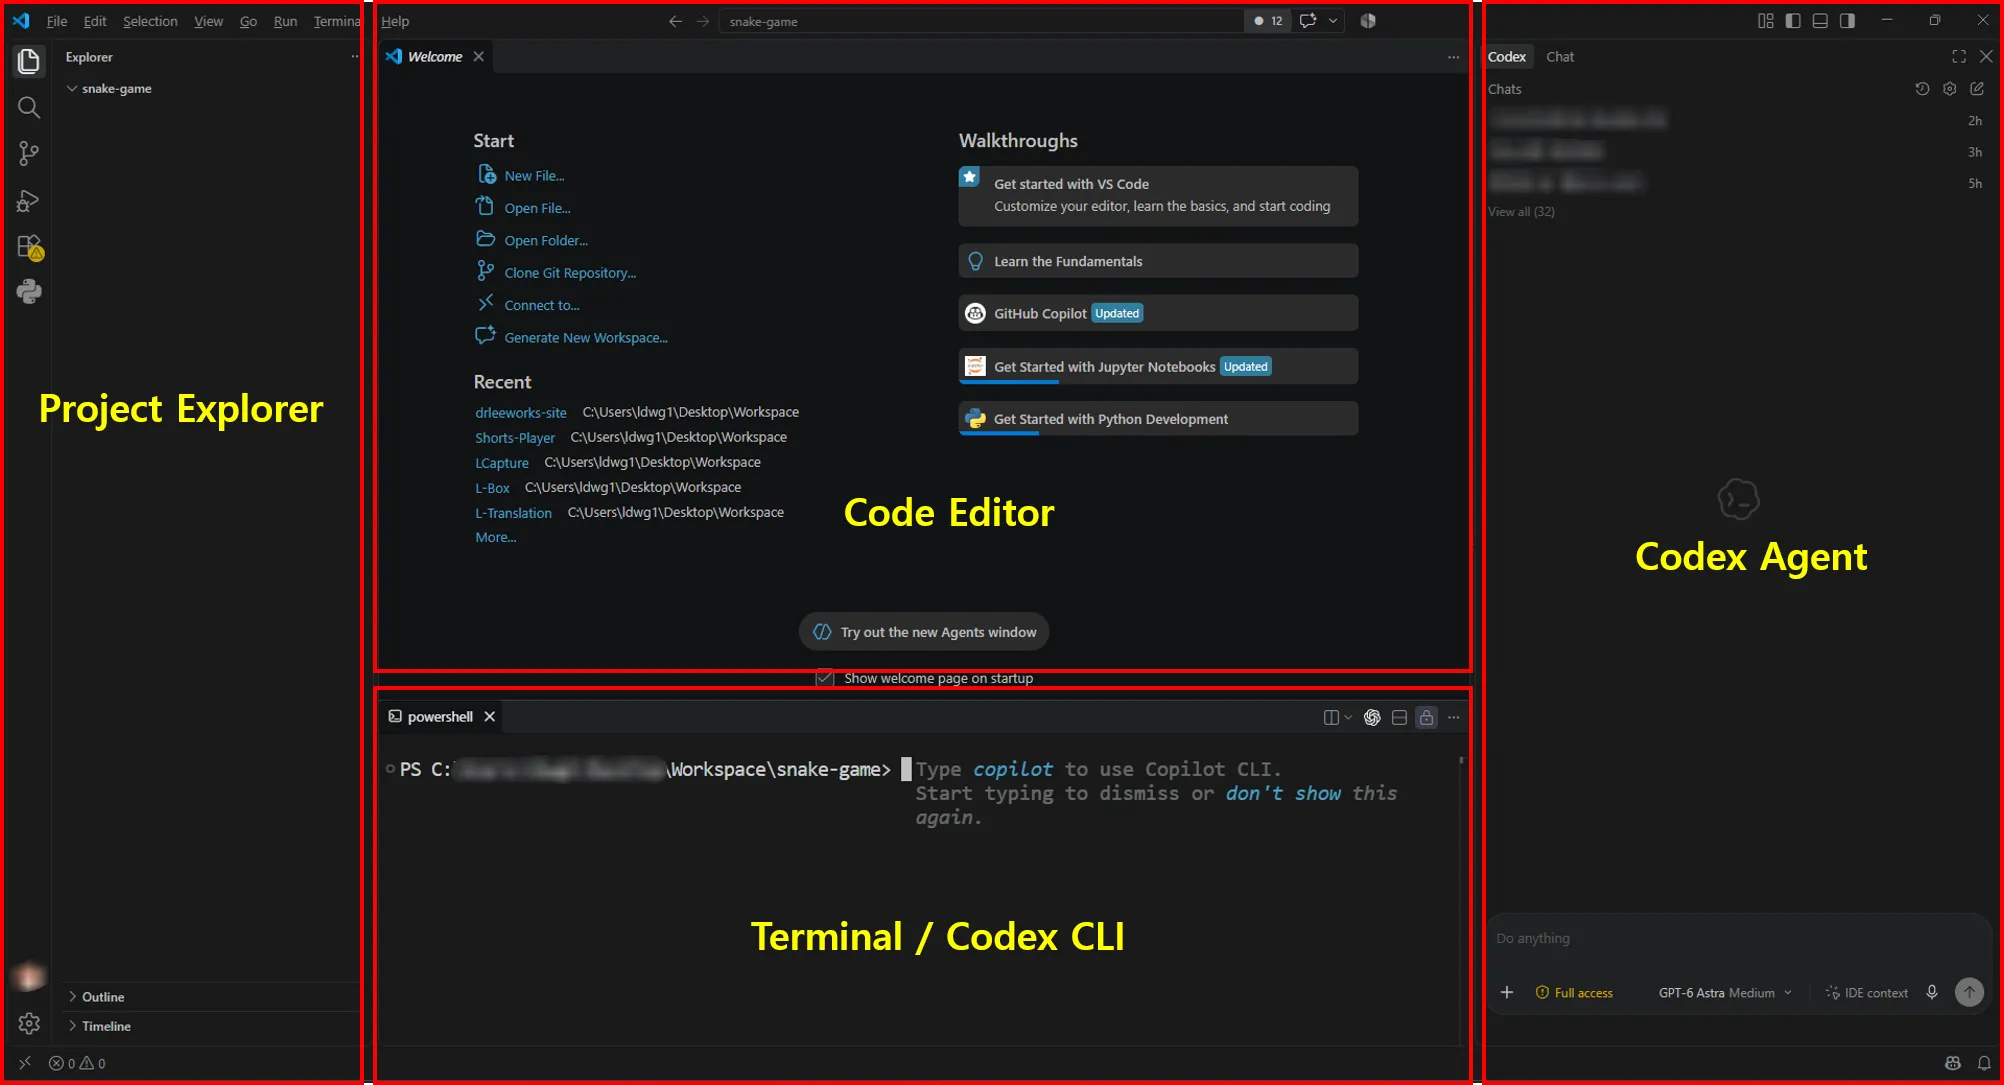
The workspace we will set up in this article. Files, code, conversations with AI, and the terminal are visible in one window. If Codex CLI is installed, run codex or codex.cmd in the terminal to open it.
| Location | Purpose |
|---|---|
| Explorer on the left | View project files and folders |
| Editor in the center | Read and edit the actual code |
| Codex panel on the right | Request work in natural language through an IDE-based AI agent |
| Terminal at the bottom | Run Python, install packages, and use Codex CLI and Git commands |
To begin, you can mainly use Codex Agent on the right. Describe the features or changes you want in natural language, check the generated files in Explorer on the left, and look at the code in the central editor. If you are not yet comfortable editing code yourself, focus on requesting work through Codex Agent first. Use the Code Editor to inspect the contents of the generated files.
Use the terminal at the bottom when you need to run a program or check a command. The screenshot shows a regular PowerShell session, where you will launch Codex CLI.
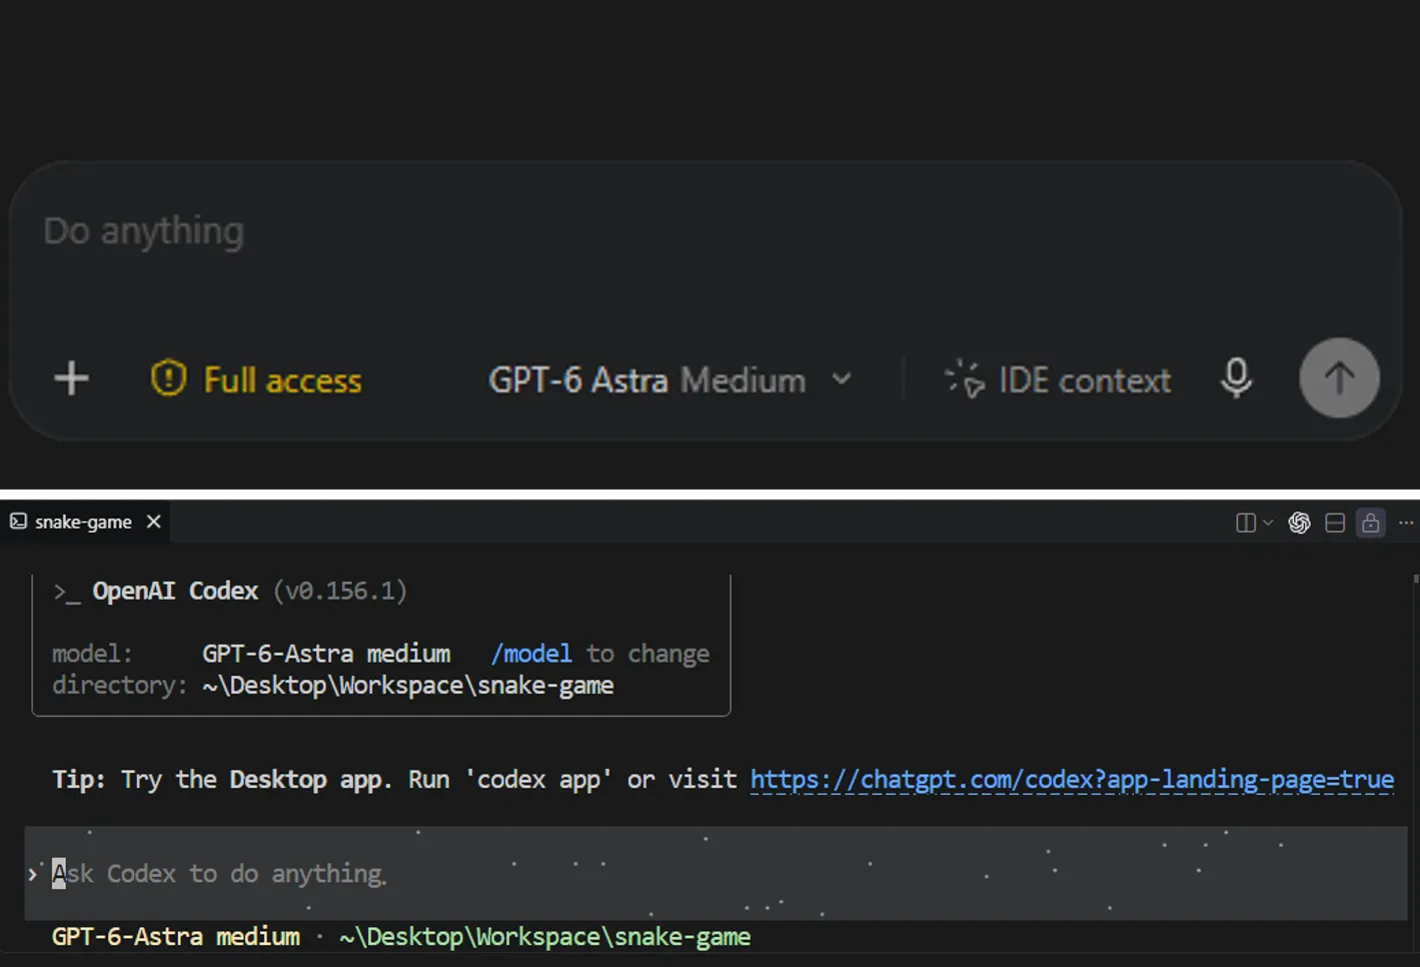
The Codex Agent composer and Codex CLI launched with the codex command in PowerShell.
The bottom of the Codex Agent composer contains these three controls:
| Control | Purpose |
|---|---|
| Full access | Sets the access permissions Codex uses while working. The screenshot shows Full access, which allows broad access. |
| GPT-6 Astra Medium | Selects the model and reasoning level. This example uses GPT-6 Astra with the Medium reasoning level. |
| IDE context | Includes editor context, such as open files or selected code, to help Codex understand what you are working on. |
You can click the first two controls to change their settings. Token or credit usage may vary by model, so choose one suited to the difficulty of your request. For simple tasks such as writing text or changing a program’s button positions or colors, you can start with 5.6 Sol Light.
The lower part of the image above shows Codex CLI after entering codex in the terminal. It displays the current model and working folder, and you can enter requests in natural language.
For now, just note the location and purpose of the two input areas (AI Agent and CLI), then follow the installation, sign-in, and launch steps below. See the official IDE guide for details about using editor context.
The instructions are based on official documentation checked on September 27, 2026. Codex availability and sign-in screens may differ depending on your ChatGPT subscription, organization settings, and installed version. This article uses sign-in with a ChatGPT account. Authentication with an API key is a separate method with its own billing and configuration. Check the official authentication guide for the method appropriate to your account.
Follow the steps below to set up this environment.
1. Install VS Code
VS Code is an editor for writing code and managing project files. Some AI agents have their own editors, but learning to connect your chosen agent to VS Code lets you work with different agents in the same editor later.
Installing VS Code does not automatically install Python or Codex. Install VS Code first, then add the tools you need one at a time. Start with the installation steps below.
- Open the official VS Code download page.
- For a typical Intel- or AMD-based 64-bit Windows PC, choose Windows → User Installer → x64. Use Arm64 for an ARM-based PC.
- Run the downloaded installer and follow its instructions.
- When installation finishes, launch Visual Studio Code from the Start menu.
The User Installer is a good starting point for a personal account. Use the System Installer if you need installation for all users. The VS Code Windows setup guide explains the differences.
Once the VS Code window and welcome screen appear, the first step is complete. Menu names below use the English UI; a localized installation may display translated names.
2. Install the Official Codex Extension
Click Extensions on the left side of VS Code (hover over the icon to see its name), or press Ctrl + Shift + X. Then search for Codex, select the official extension published by OpenAI, and click Install.
Several extensions may have similar names, which can make it hard to tell whether you have the right one. If unsure, use the installation link in OpenAI’s official documentation. The official Marketplace extension identifier is openai.chatgpt. Check the publisher instead of relying on the name alone.
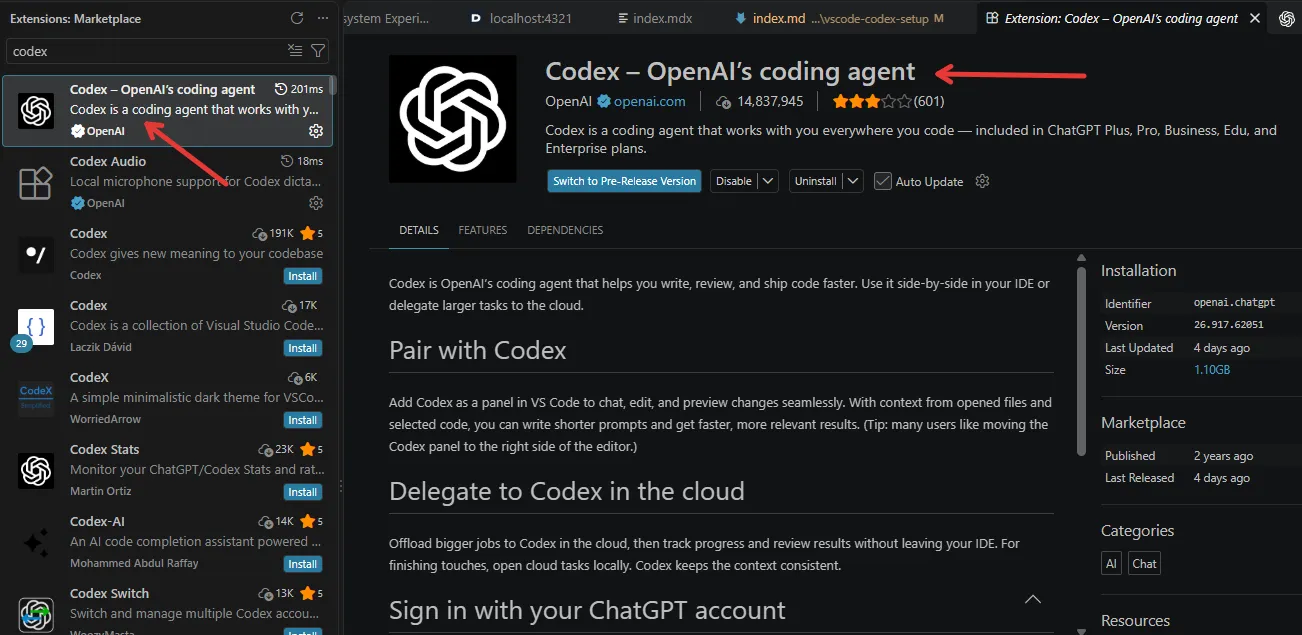
This screenshot was taken after Codex was installed. On your first visit, click Install. Check carefully because several extensions have similar names. After installation, a clickable Codex logo appears in the upper-right area, as shown in the screenshot. Click it to open the input panel on the right.
The extension page will show that installation is complete. If prompted to reload or restart, do so.
3. Open the Codex Panel and Sign In
After installing Codex, click its icon in the upper-right corner of VS Code. If you cannot find it, press Ctrl + Shift + P to open the Command Palette, search for Codex: Open Codex Sidebar, and run it. This is the panel-opening command described in the official IDE guide.
Once it opens, you should see the Chat and Codex tabs side by side. You can rearrange them by dragging the Codex tab to the left. GitHub Copilot subscribers can use the Chat tab as an AI agent.
If sign-in is required, select Sign in with ChatGPT and connect your account in the browser. After authentication, return to VS Code and check that you can enter a request. Some of these steps may be skipped if you are already signed in.
Once you have signed in to Codex, the remaining steps become easier. If something is unclear, ask Codex a question or request help with the task. If an Allow button appears while it is working, read which permissions it requests and decide whether to authorize the action before clicking.
For tasks it cannot perform directly, ask for specific instructions you can follow yourself.
Move Codex to the Right
Keeping Explorer on the left and Codex on the right makes it easier to see your files and conversation together.
- Select View → Appearance → Secondary Side Bar to open the secondary sidebar.
- Drag the title or tab of the Codex view to the secondary sidebar on the right.
- Select Explorer again on the left.
If moving the view is difficult or the layout gets confusing, run View: Reset View Locations from the Command Palette to restore the default arrangement, then try again. See the VS Code layout guide for sidebar visibility and moving views.
You can now keep code in the center and Codex on the right. After opening a project folder, you can ask Codex to inspect or modify files in that folder.
4. Open the Terminal at the Bottom
Choose Terminal → New Terminal from the top menu. The shortcut is Ctrl + Shift + Backtick; the backtick key is usually to the left of the number 1 key. The VS Code terminal guide describes the same method.
You are ready when a command input area opens at the bottom. Commands in this article use PowerShell. If another shell opens, select PowerShell from the dropdown next to the new-terminal button.
In the Codex panel, describe a task such as “Make a game.” In a regular PowerShell terminal, enter commands to execute. After launching Codex CLI in a terminal, you can use natural-language requests there too. Remembering which input area you are using helps avoid confusion.
You can start with Codex Agent alone instead of Codex CLI. For a beginner, the practical difference is small.
5. Create One Folder per Project
Before creating a program, decide where to save it. The basic rule is one project = one folder.
Documents/
└─ Coding/
   ├─ SnakeGame/
   ├─ ImageTool/
   └─ MyFirstApp/
In Windows File Explorer, create a Coding folder inside Documents, then create a SnakeGame folder inside it. You can use a name such as Workspace instead of Coding. In VS Code, choose File → Open Folder and open SnakeGame. If prompted to trust the folder you created, verify that it is the correct folder and proceed.
When SnakeGame appears at the top of Explorer on the left, it is your current workspace. Separate project folders keep code from getting mixed together, make it easier to manage Python environments and Git history, and help you explain the scope of a task to Codex.
After opening the folder, choose Terminal → New Terminal again. Check the current location with:
Get-LocationMake sure the result points to the SnakeGame folder you just opened. The actual path may vary between PCs, especially if Documents is redirected to OneDrive. What matters is that the terminal and Explorer point to the same project folder.
6. Install and Run Codex CLI
You can skip this step if you want to try Codex Agent alone first.
The Codex extension runs in a VS Code panel, while Codex CLI runs in a terminal. We will prepare both, but start editing files through just one of them. Asking both to modify the same files at the same time can mix up the work.
The Windows section of the official Codex CLI installation guide provides this command for the standalone installer. Enter it in VS Code’s PowerShell terminal:
powershell -ExecutionPolicy ByPass -c "irm https://chatgpt.com/codex/install.ps1 | iex"This command downloads and runs OpenAI’s installation script. Check that the address matches the official address above, then follow the installation instructions. ByPass applies to the PowerShell process launched by this command; it does not permanently change the execution policy for the entire PC.
This installation method does not require a separate Node.js or npm installation. The official documentation also provides an npm method, but npm is a Node.js package installation tool, and this article uses only the standalone method.
After installation, open a new terminal and check:
codex --versionIf the command is not found, fully close VS Code and reopen the SnakeGame folder. Once a version is displayed, run Codex from the current project folder:
codexIf authentication is requested, select Sign in with ChatGPT and connect through the browser. The IDE extension and CLI can share sign-in information in the same environment, so it may open without another sign-in. The official authentication guide explains how credentials are shared.
If asked about trusting the working folder or configuring the Windows sandbox, review the folder and settings. If installation or command execution is blocked, check the displayed error and consult the Windows sandbox guide.
When the CLI input appears, try:
Check my current working folder. Do not change any files yet.You can also check your remaining Codex allowance with the following command. The bottom of Codex Agent also has a usage display, but I prefer checking in the CLI because updates in the Agent display can be slow. The CLI may not reflect changes immediately either.
/statusYou can now use the Codex panel on the right and Codex CLI at the bottom. To run Python commands, click the + button at the bottom to open a separate PowerShell terminal. This is different from pasting a Python command into the conversation input of a running Codex CLI session.
If commands still cannot be found, What Is PATH? explains how the computer locates executable files. You can also ask Codex Agent to help resolve the problem.
7. Ask Codex to Prepare a Python Environment
If you only want to follow the web game example, skip Python setup and go to the web game request in Section 8. This section prepares you to create Python programs as well.
Running a Python program requires a Python interpreter. Installing the Python extension in VS Code does not install the interpreter itself. Install Python separately, then create a project-specific virtual environment to keep each project’s packages separate.
Ask the Codex panel on the right:
I want to develop a Python program for Windows in this SnakeGame folder.
Check whether Python is installed on this PC and whether the environment is 64-bit.
If Python is missing, explain the official installation method and help me install it.
Create a project-specific virtual environment in a .venv folder.
I plan to use Python's tkinter for this example, so check that tkinter is available too.
Before installing programs or packages or making changes outside the project, explain what you will do.
Finally, report the Python version, interpreter path, and environment check results.
Read what Codex finds before proceeding. If installing system software requires user interaction or permissions, you may need to complete an installer yourself. Check what is being installed, and ask for project packages to be installed in this project’s virtual environment.
To check manually, use a separate PowerShell terminal:
py -3 --versionIf Python is missing or py cannot be found, install the appropriate Windows version from the official Python downloads page, then reopen VS Code. Confirm that the command displays a version.
If Codex has not created the virtual environment yet, run this in the SnakeGame folder. There is no need to recreate an existing .venv:
py -3 -m venv .venvThen check the environment by specifying its Python executable directly:
.\.venv\Scripts\python.exe --versionThis article uses the virtual environment’s executable path directly, so you can follow along without a separate activation command. The Python venv documentation explains the purpose and use of virtual environments. For now, just remember that venv means a virtual environment. You will encounter it often when coding in Python.
Also install Microsoft’s Python extension from Extensions in VS Code. Press Ctrl + Shift + P, run Python: Select Interpreter, and select this project’s .venv. If it is not listed, choose the option to enter an interpreter path and specify .venv\Scripts\python.exe. See the VS Code Python tutorial for the detailed interface.
Your environment is ready when .venv appears in Explorer and the command above prints the Python version.
8. First Example: Create a Snake Game
Request a Web Game and Check the Generated Files
Start by entering this request in Codex Agent on the right:
Make a simple Snake game. It should run on the web and be buildable with build.cmd.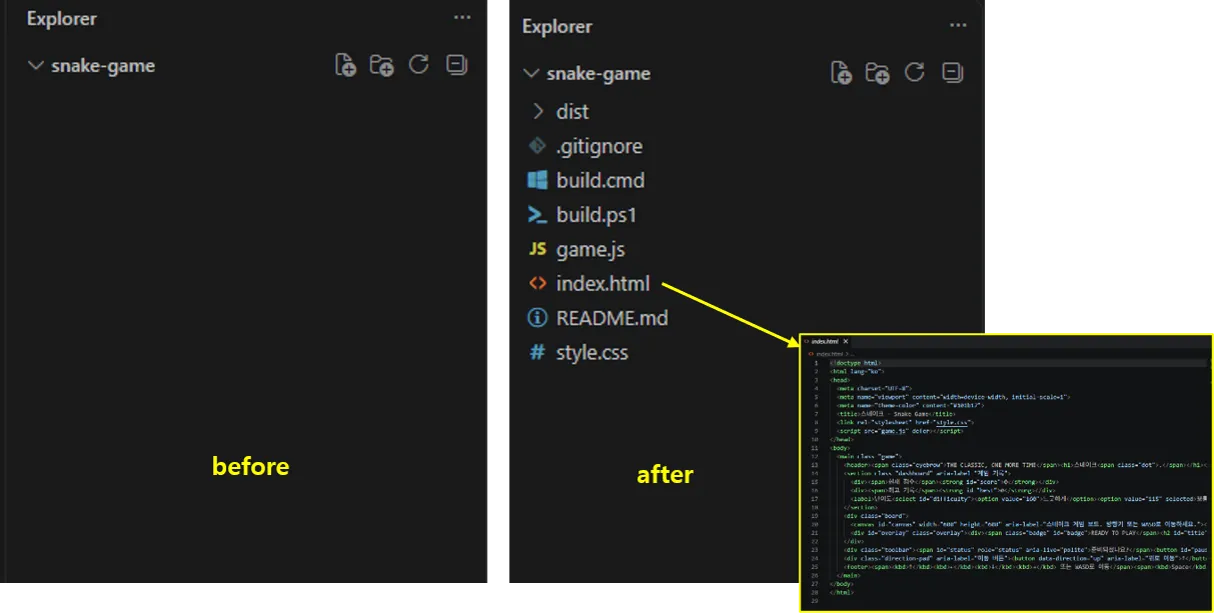
Before and after requesting a Snake game. The lower-right inset shows the generated index.html code.
The left side shows the initial empty folder. The right side shows it after Codex has written the code and run the build. A request to Codex Agent can automatically produce several files. index.html defines the game screen’s structure, style.css handles its appearance, and game.js implements movement, scoring, collisions, and other game behavior. build.cmd and build.ps1 prepare the deployment files, while README.md explains how to run the game. The dist folder contains the build output.
After reading Codex’s response, click the generated files in Explorer to inspect the actual code. File names and organization may vary with the request, so use the generated README.md as your guide for running it. The project folder in the screenshot is named snake-game; it serves the same purpose as the SnakeGame folder created earlier.
If You Want a Python Program
As the web game example shows, the language and execution method depend on your request. To try running Python and building a Windows executable, specify the language and execution method clearly. For a separate exercise, open a new project folder, prepare the Python environment from Section 7, and ask:
Create a simple Snake game in Python.
It should run in a separate window on Windows, not as a web page.
Use tkinter from Python's standard library for the GUI, and name the entry file snake_game.py.
Create the required files inside this project folder and use Python from .venv.
Let me move the snake with the arrow keys, increasing its length and score when it eats food.
End the game if it hits a wall or itself, and let me restart.
If additional packages are essential, explain why and install them in .venv.
When finished, document how to run it in README.md and perform the checks you can.
Tell me which visual checks I need to perform if you cannot check them yourself.
Codex can create the necessary files, write the code, and fix errors discovered while running or checking it. When it finishes, go beyond reading the response: check Explorer on the left for snake_game.py and README.md. Click snake_game.py to see the actual code in the central editor.
The generated result can vary with your request and environment. If the entry file has another name, check README.md for the launch instructions or ask Codex to rename it to snake_game.py to match this article.
9. Run the Game and Fix Errors
Run the Web Game
A simple request such as “Make a Snake game” often produces a web game that runs without installing additional packages. In Windows File Explorer, double-click index.html in the project folder to open it in your default browser. To find the file from VS Code, right-click index.html in Explorer and select Reveal in File Explorer. Opening the file in VS Code’s editor is different from running it in a browser.
If a regular PowerShell terminal is already in the game project folder, you can also open it with:
Start-Process .\index.html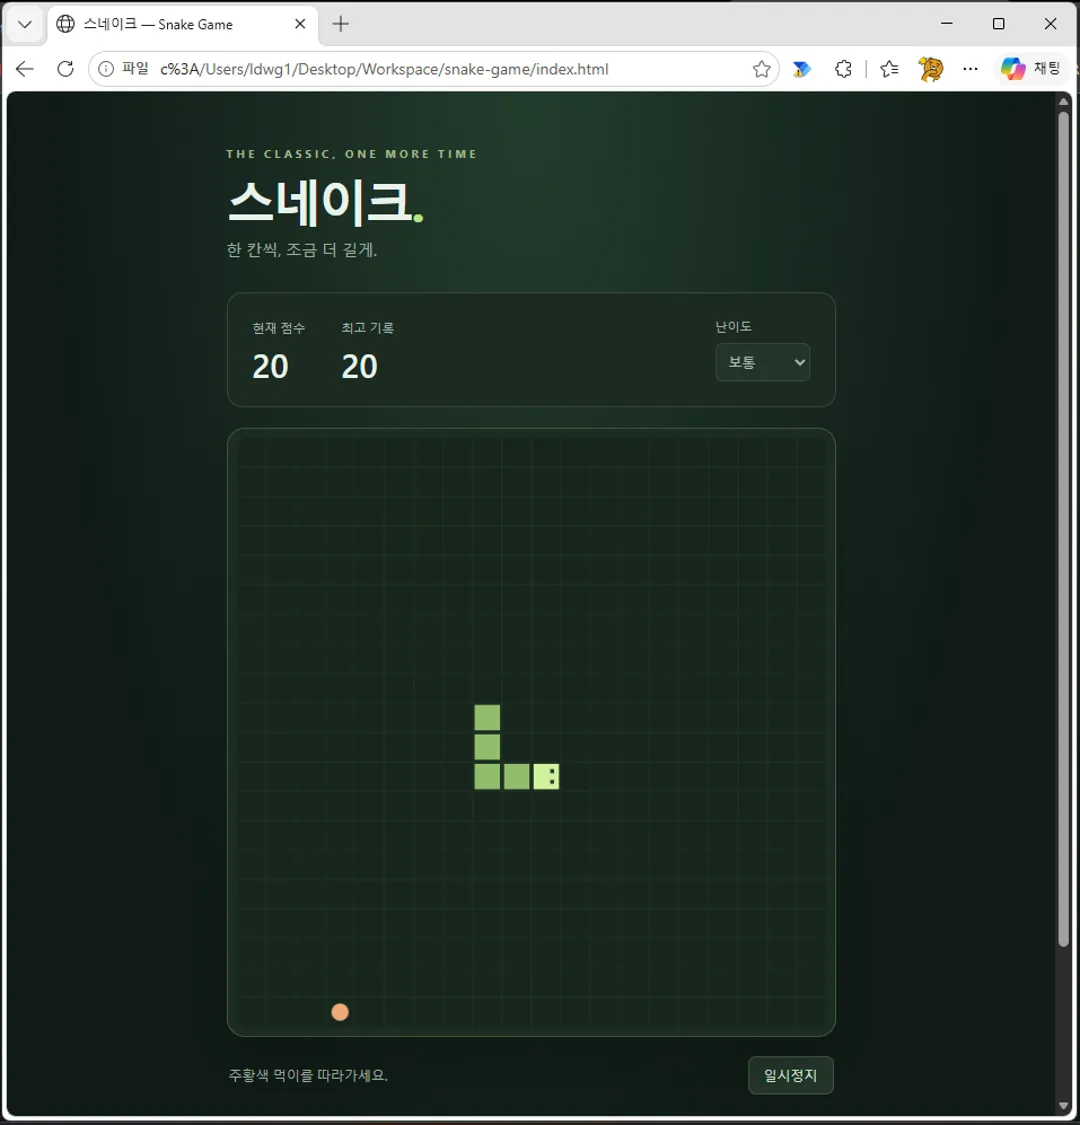
Playing the Snake game after opening the generated index.html in a browser.
Click Start Game, then use the arrow keys or WASD to move. Eating orange food makes the snake longer and increases your score. Use Space or the Pause button to pause and resume. If you hit a wall or the snake’s own body, you can restart. Try movement, eating food, collisions, and restarting yourself.
To prepare deployment files, run the following in a regular PowerShell terminal in the same project folder:
.\build.cmd
Start-Process .\dist\index.html
In this example, build.cmd runs build.ps1 to copy the HTML, CSS, and JavaScript files into dist. The output consists of web deployment files. Share the files in dist together or upload them to a static web host. This output differs from the Python executable built in Section 10.
Run the Python Game
In a separate PowerShell terminal, check that your current folder is SnakeGame, then run the program. This command applies if the requested snake_game.py file was generated:
.\.venv\Scripts\python.exe .\snake_game.pyWhen the game window appears, test arrow-key movement, eating food, collisions, and restarting. Closing the game window returns the terminal to a state where you can enter another command.
If an error occurs, copy the terminal’s error message and send it to Codex. Include the command you ran and what you expected to happen to help narrow down the cause.
I ran .\.venv\Scripts\python.exe .\snake_game.py and got the error below.
Find the cause and fix it. After the fix, check again using the same command.

[Paste the actual error message here]
You can also request changes such as “Slow the game down a little” or “Let me restart with Enter after the game ends.” The basic workflow is to repeat request → inspect code changes → run it yourself → report errors or improvements.
10. Build a Windows Executable
This section applies if you created the Python version of the game. To make it easier to run on another PC, you can package the components needed to run Python together with your program. Here, “build” means packaging an executable.
Start by asking Codex:
Package this program so it is easy to run on another 64-bit Windows PC.
Check whether PyInstaller is available and install the necessary build tools in .venv.
For the first build, use a folder-based distribution with a console so errors are easy to inspect.
The entry file is snake_game.py, and the output should be named SnakeGame.
Document the executable location, the folder to distribute, and the launch check results in README.md.
If using PyInstaller, the manual commands look like this. You do not need to repeat them if Codex has already completed the build:
.\.venv\Scripts\python.exe -m pip install pyinstaller
.\.venv\Scripts\python.exe -m PyInstaller --onedir --name SnakeGame .\snake_game.py
To repeat an earlier point, you do not have to memorize these commands. You can simply ask Codex Agent to “Build this so I can run it.”
With these settings, the result is at dist\SnakeGame\SnakeGame.exe. Try launching it from File Explorer. To transfer it to another PC, copy the entire dist\SnakeGame folder. Copying just the executable may leave out required files. See the PyInstaller usage guide for build options and output structure.
Compatibility depends on the Python version, operating system and CPU architecture, external libraries, and additional files, so the same result is not guaranteed on every PC. Build Windows output on Windows and test it on the PC where it will actually be used.
11. Track Changes with Git and GitHub
Once the program runs, it is a good idea to record that working state. If a later feature causes problems, you can compare what changed and find earlier work. An AI agent may implement a change differently from what you intended, remove an existing feature, or rebuild something from scratch. Tracking the project with Git and GitHub lets you return to a previously recorded version.
Git manages the history of code changes on your computer, while GitHub stores and shares Git repositories online. Saving a file in VS Code and recording a version in Git are separate actions. The GitHub introduction to Git covers the basic concepts.
| Term | Meaning |
|---|---|
| commit | Select changes and record them as one entry in the history |
| push | Send local commits to a remote repository such as GitHub |
| pull | Retrieve remote changes and integrate them into the current branch |
Think of a commit as a record of your current changes in the project’s history. You can make several requests to Codex and commit once, or commit after every completed request. Personally, I do not commit every tiny adjustment, but I always commit after a substantial change. I often ask it to “Commit and push” to send those changes to the remote repository as well.
Documents or code you edited yourself may sometimes be left out of a commit. In that case, make the scope clear with a request such as “Include my manual edits in the commit too.”
People familiar with the commands may find it faster to type them directly, but beginners may find natural-language requests more convenient.
A push works like a form of cloud backup. Just as you can download backed-up files on another computer, GitHub and push let you continue the same project across computers. Push from computer A, then pull on computer B to continue working there.
When working across two or more computers, establish an order of work to keep changes from getting out of sync. For example, commit and push when you finish on one computer, then pull the latest changes before starting on another. To reduce confusion, you can avoid editing the same project on two computers at once.
Edit on my PC → commit → push → GitHub repository
Use the same repository on another PC → pull → get the latest changes
As the number of projects grows, it becomes easier to lose track of what you did on each computer. Before leaving the computer you are working on, make a habit of reviewing your changes, committing, and pushing. Another option is to work on a single computer through remote access. If most of your work consists of making natural-language requests and checking the results, even a phone or tablet can be a reasonably comfortable way to work.
Check whether Git is installed in the terminal:
git --versionIf the command cannot be found, follow the official Git installation instructions for Windows, then reopen VS Code. You will also need a GitHub account to connect to GitHub. Creating a repository, making the first commit, and connecting a remote can be covered in a separate article.
Before the first commit, ask Codex to prepare a .gitignore. Exclude environments and generated output such as .venv/, __pycache__/, build/, and dist/, while tracking your code and launch instructions. Keep passwords and credentials out of the repository as well.
12. Start Your Next Project
If you have followed the steps so far, your workspace looks like this:
VS Code
├─ Explorer → Project files
├─ Editor → Code
├─ Codex panel → IDE-based AI agent
└─ Terminal
   ├─ Python → Run programs
   ├─ Codex CLI → Request AI work from the terminal
   └─ Git → Track change history
Start the next project by creating and opening a new folder. Begin with a small program and follow the workflow: describe what you want to make → inspect the code Codex creates or changes → run it yourself → fix errors → record the result with Git.